Sunday, June 30, 2013

Handle : JK Tin Knife in Walnut Burl

Hello All,

So I won a JK tin knife from JK knives in an Altoids competition Here and was fortunate enough to receive it form the maker himself when I went to the "MI Spring Gathering" Here where a bunch of us knife nuts group together and stare at each others knives.

Unfortunately I've let go of most of the pictures I took of the process because I usually upload them to an online picture service which requires regular cleaning out so I can upload more, but I do have some left and I'm now downloaded all of my past pictures so i can start posting them here. So in the future this shouldn't be much of a problem, at least not with new projects!

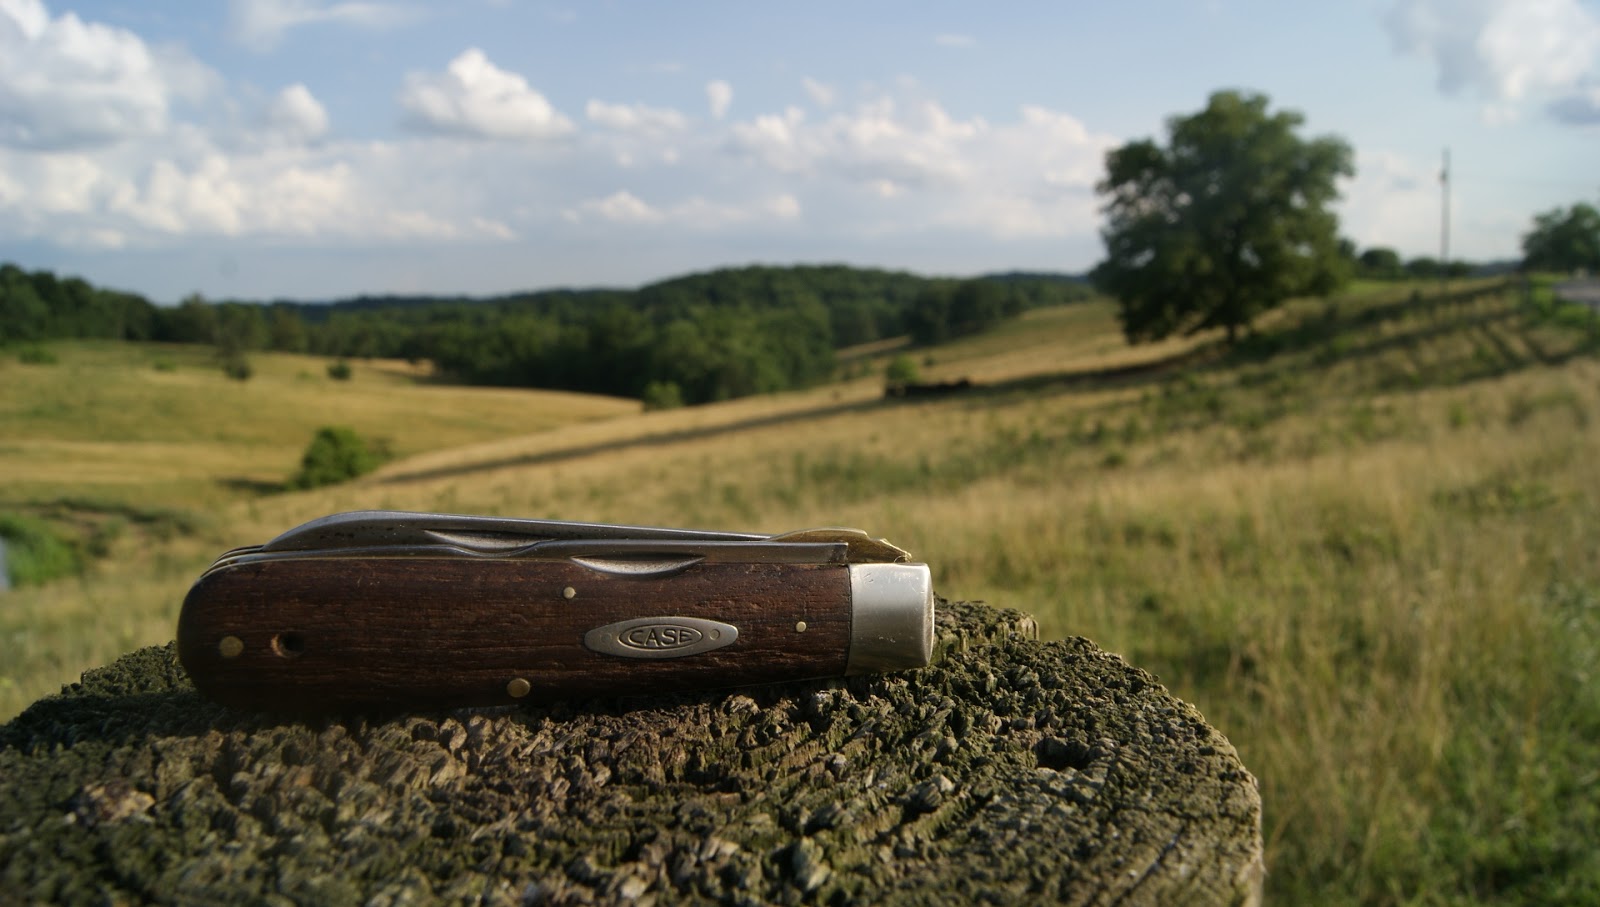
Here's the finished handle;


 Here's what it looke dlike to begin with:


The other knife that needs a handle in this picture is the JK Riverwoods companion designed by JDS1 (Bladeforum screen name, someone i think has a particularly good eye for knife design, but I digress), I have finished pictures of it in the "Picture post" linked on the left under "Handles I've finished" or whatever I've called the link, unfortunately I've lost all the Work in Progress (or WIP) pictures I had of it.)

The Tin knife is a neat little knife made from 1/8" thick O1 steel and when John gave it to me he asked if I was going to put handles on this one to. I found it hard to say no to that. Anyway, I came home eager to get going and proceeded to break two sets of walnut burl scales for this little knife.

Here are the scales taht actualy made it on the knife, sfinaly secured on there with brass pins. I slapped on a very poorly fitted pair of scales to avoid breaking any more and decided to sand them to shape on there to save any more "unlucky events."


FYI, when playign with sharp objects, tape up the sharp bit. I've wlays done this and have still been "bitten" on more then one occasiona dn have heard horror stories of emergency room visits from others. Buy some painters tape and get the sucker neutered before you fool around with it, it's just good sense:)

I then preceded to "round" the handle, as is my want. I like to make it completely round most of the time because it's just more comfy looking and I prefer the look. It takes more time but I'm not in a  rush, this is fun, remember :)


Walnut "burl" means that this wood came form one of those ugly "growths" on the side of tress, well, i don't find them ugly but they do kinda look like a giants nose leavings (sorry about that) but inside those growths are some very interesting grain patterns, like you see here. Now the downside of Burl is that the grain can created flaws in the wood, as you see on this right scale a piece of the wood came out after a little sanding. there's not much you can do to prevent this This wood has been even stabilized, (which essential means impregnated with a mixture of sorts to try and prevent cracking and breaking. it's a complicated and skillful process I do not do...yet...probbaly.) Anyway there are ways to fix it up using wood dust and glue, for exmaple, or sanding them out, i decided I didn't mind it so much.

The handle went very smoothly form here, the handle shape was easy enough to make getting at it's curves simple enough and overall it was a very enjoyable experience, yet again.

Here's how most of my sanding gets done now I have a vice, especial during the heavy duty shaping work:


I was lavish with the epoxy as well, just to make sure.  After I had to shaped the way i wanted using 100 grit sandpaper I went on to do the polish sanding up to 1000 grit.


Anyway, this thing's a mean little cutter. and is a very easy to carry around pocket companion. It's also much more comfortable in hand then I'd have imagined. for a while there I couldn't leave the house with it on my belt so i also made it a belt sheath, this made it much easier to do ;)

 In hand shot
 What the "damadged" side ended up looking like...I still don't want to "fix" it, that's character that is :D


 Anywho, hope you enjoyed the pictures and whatnot

See ya

Saturday, June 29, 2013

A Walk down the road: June 2013

So today we went for a walk down the road and saw a barn painting at Alpaca Berry Farm and watched them shear the Alpaca.


Later in the day Sam, my 6 year old son, wanted to go for a walk. The grass is up pretty high so we decided just to take a walk down the road, I swiped my wife's camera in the hope there might be some knife picture opportunities. There are many great Knives photographers out there, I am not one of them, but I do like to have a reason to be walking.

This is a JK Trapline, designed by Outdoorsfan (Avatar name on Bladefourms) and is one heck of a wood knife) and a Case Electricians knife from the late 60's. I had a different folding knife in my pocket this morning during the Alpaca shearing but because I seem to be unable to stick with the same folding knife for a whole day since taking my two favorites out of rotation for the purpose of "trying something new"....grumble grumble.

We can't go for a walk with our dog Lucy coming along and if she notices that one of our cats can't let her go alone either
 Got a nice shot of the grain on this iornwood
 Found a  few posts I though looked like the need a knife perched on them a  while


 had to take the guard of Sam's bike because the chain keeps falling off, used the screw driver blade on the case to do it, back to walking (see, useful :))
 Saw some cows in the farm across the way
 A look back towards home
 Racing
 unhappy
 more scenery

All in all a nice walk to finish off the afternoon I though,

thanks for reading, or picture watching :)

Re-Handle: Boy Scout Hatchet in Walnut

Hello all,

I was going to save this till i had it finished, or leave it if it didn't work out, but a friend of mine on here wants to see it , so...hope I'm in the right forum.

I have had this Boyscout hatchet for a while now, bought it at Court Day last year as a possible re handle project because one of the scales was broken. I used it in the HERE some time back as well.

here's the finished handle

 I'd been trying to learn how to re-handle knives since John of JK Knives started offering blade blanks, I've done two so far a JK LRK and a BK16, both worked out well enough and were good learning experiences. With some extra time (or need for distraction more like) at the moment I decided to go ahead and start on this hatchet.

Anyhow my "method," such as it is, and my tools are "works in progress," so far this is what I have:

1. Hands..clumsy but they're here
2. Small wood files (might use them this time)
3. Sand paper from 60-400 grit
4. A Dremel (I've been using it to rough cut the scales out but I'm thinking of moving over to a coping saw)
5. Drill press, small, cheap and for light work only
6. pen
7. WD40

so, here we go,

Step one: Cleaning


I scrubbed it down with some 100 grit sandpaper to clean it up a little until it looked like this. I also washed it with soapy water and then gave it a vinegar bath because I had read that this can help to halt and prevent rust.


I thought about moving up the sandpaper grit and making it all shiny but decided I liked it better this way.

I did give it a good rub down with a cloth and some WD40 before I called it ready though.

One last thing, when you spend a good few hours over a couple of days sanding off the grime on a hatchet head, then wash it in the sink, be aware that you may have inadvertently brought it to a razors edge, and that metal gets slippery when wet

It was one of those fine cuts that bleeds everywhere when you try to use the thumb, ho hum.

2. Planning out the scales
I chose walnut and brass because I like it, unfortunately it seemed hard to get much bigger then 6.5 inches of wood...ha ha ha, I'll let that sit with you for a while...so my original plan of having a full length handle went out the window. I did toy with the idea of using two pieces for each scale, but decided I'd better get good before I start making things complicated.


My first issue is that even at 6.5" the wood doesn't get over the top of the last hole. So after some consideration I decided I needed a lanyard hole at the bottom of the hatchet.

The handle, unlike the blade blanks I'd worked with, had a "railing" I suppose I can call it. After some heart searching - and turkey because it was thanksgiving - I decided I'd made life too easy on myself so far and that I needed to mark out not only the handle contour but the railing as well.


3. Cutting the scales

I made the mistake of laying the first one in the middle of the wood and not at the end (more cutting!) but since I'm stubborn I didn't change it but cut it out this way anyhow.


My plan is to cut a rough scale that fits over the whole handle, then sand a groove into the edges so the wood sinks down into it.

This, I thought, would also make it easier on my hands because a hollow handle, might, vibrate more...that's my story and I'm probably going to stick to it as long as it takes someone to correct me (at which time I will probably have known that all along...or something)

4. Holes and grooves, oh my!
First I had to cut the scales, I've found a coping saw is simple the best,e easiest way of doing this without having a bandsaw or something of the more expensive kind.


I also planned out and drilled the holes for the pins at this point. A drill press or something hat can work like one like a Dremel Work Station is about the only expense I'd say is absolutely necessary to try some of this stuff. You can find a way of doing most things without a special machine but it's just not worth the wasted time and wood to try drilling straight holes all the time.


Next i had to actually make those grooves in the handle which provide more difficult then I had thought, sanding them was tedious and difficult work since I had a specific path I had to follow . In the end I had a broken file and I sharpened the end and plained the wood away.


5. Attaching the handle
So luckily my holes lined up (because i didn't always remember to check) and the pins fit said holes. My basic method of attaching the handles is to glue or epoxy the wood and pins right on tot he handle. I'll then spread the head of the pins by cutting the excess but leaving enough you can use a punch to flatten and widen the pin in the hole. I don't think most "Penning" is necessary given modern adhesives and haven't always done it. never had any trouble  not doing it either. But there you go.

6. Sanding the handle
Nect thing was to sand and around the handle. I start of using 100 grit sandpaper just like on the hawk, then I progress up through 150, 200, 320, 400, 600, 800 and sometimes even go up to 100 which creates a very smooth and silky surface, wwhich is nice, but sometimes I think not the best idea, say on a hatchet you're going to be swinging around. Slippery can sometimes be bad. So for this one I stopped at around 400 grit sandpaper. 

I didn't have a vice at the time so as you can see I "clamped" the hatchet between two boards on my bench and then used the shoeshine method of sanding, (very quick and effective for hand sanding) to round the wood, get it the right thickness hat was comfortable for my hand, then sand it down through the different grits to make it feel nice.

I now have a vice, a small hobby one, and it makes this stage so much more easy, and safe. It's surprising how difficult it is to concentrate on the work when the (now sharp) hatchet keeps threatening to come out of the broads and cut your foot off.

Besides a drill press, I'd say a vice is about the next most important thing when working with sharp objects and wood. depending on when you ask me, I might say it comes first right after safety gloves, a mask and eye protection all of which I've learned to use the hard way and wish I hadn't had to :)

7. Finishing
I finish wood handles using linseed oil. I just always have, it's cheap enough, traditional as all get out, and I think brings out a very nice finish, especially on walnut. I give a wood handle at least 4 coats letting it dry in between each one. I have also heard the heat in your hands can help it penetrate the wood and take a stronger hole, not to mention helping the grain stick out more, so I rub it in pretty good as well :p

I've tried buffing and polishing handles since, and it can work to bring out that nice shiny finish but it's not my favorite. I like the idea of just using linseed oil so I mostly just do it this way still. Also anyone who has been noticing the Knife helper I had around while doing the hatchet it's a JK Sams Swayback, I designed it and John of JK Knives built it and was kind enough to put it in his line up so others can order it. John's motto is "Your design or mine" and he means it. There's nothing I enjoy more then putting a handle on a  JK knife but he put the handle on this one though, in maple burl and brass (I like brass and wood :))

I have his website linked on the right of the page in the links section and will put it in this post a time or two as well.

Thanks for taking the time to read this, or at least looking at the pictures then glancing down to this sentence, or however you do it

Friday, June 28, 2013

Picture Post

I'm going to collect some pictures of handles I've put on knives and hatchets, hope you enjoy looking through them:

Sheaths and beads:


Different sheath


Jk Pocket knives from Knife project

Osage
 walnut rover


JK EDC Kephart Design (Rosewood Burls Scales, 1/4" mosaic pin and 1/4" Brass pin, I made the sheath)


 JK Riverwoods EDC (Cocobolo Scales, 1/4" Mosaic pin, 1/4" Brass Pin, Copper Lanyard hole, bead made from wood cut of the scales, I made the sheath)


Case pairing Knife, 1985, The great Americans Series, I rehandled in walnut, 1 mosaic pin and 2 1/8" brass pins, I made the sheath)


JK Tin Knife (Walnut Burl Scales2 1/4" brass pins I made the sheath)


JK Toby's Knife V2.0 (Maple Burl handle was made by John Kiedaisch of JK Knives, I sanded and stained it to bring out the garin and added the wooden bead on the leather lanyard)


 JK Fish Knife ( Maple burl scales, 1/4" mosaic pin, 1/4" brass pin, I made the sheath)


Boy Scout Hatchet (Walnut Scales, Brass pins)


Case Sodbuster, CV, (Maple burl scales, Brass pins, pocket clip)


Been going through a landyard phase on my GEC Bullnose
My favorite knife: Jk Toby's Knife

Wenger 51 Re-Scale